an approach to design - the basics

Design: the basics
Design, or designing, are terms that encompass many complex concepts all rolled into what many would perceive as a deceivingly simple activity. It is a fulfilling act to design and bring a vision you have to life. Creating something with your own hands is a very rewarding challenge and I would encourage everyone to design and build something at least once. Of course, If it were that simple everyone would do it, and there go the challenges and pitfalls of attempting such a feat. It can be frustrating the first time around, and if taking the wrong approach, can lead some to give up. I don’t want anyone to give up, I want to help people succeed in their projects because the world needs more creators and artists innovating and pushing the limits. In this short blog I break down my approach to design. I won’t dive too deep into engineer concepts; we can save that for next time. For some of you with an engineering background this may seem a bit simple, but for those of you approaching designing for the first time this is a basic set of principles to structure your work, minimize the frustration, and get you to the finish line, so let’s dive in!
Materials
Know your materials. When it comes to furniture not all wood is equal. There are hardwoods, softwoods, woods that resist rot, such as cedar. Woods that are naturally antimicrobial, such as fruit woods. Some woods are resin filled, such as pine. And other woods, such as teak are naturally oily and repel water. The properties of the materials you plan to work with can be used to your advantage. On the flipside, the physical properties of the material you work with can be a great hinderance. For example, pine resin can clog up your blades on a planer quite easily, ruining your blades and setting you back on your budget. Doing some research on the material you are planning to use is a great first step in the design process. The physical characteristics of materials can make or break your design. Sometimes it’s the consideration you didn’t anticipate that can become an issue. Take for example a materials response to heat and temperature change. Like all other materials, wood has a coefficient of thermal expansion. They creak and expand so you might want to keep in mind the environment your creation will inhabit, or better said, what impact the environment will have on your creation. Should you re-enforce a floating table top with a steel U-channel? Should you also include slots on the U channel so the wood can expand? Probably yes. These kinds of considerations extend beyond furniture design and extend beyond wood. Sometimes materials can be tricky and doing a hefty amount of research can go a long way. I have experience in rubber molding and design for molding is quite intensive. When designing a mold for rubber products you need to factor in shrinkage, so the mold will be intensionally oversized. And not all rubbers are the same, there are silicones, organics, neoprene, the list goes on. You must approach each one differently. A mistake in a manufacturing environment can cost thousands. So, engineers learn to research and do their due diligence. Whether you’re working with metal, wood, foams, steel, you should do some research on the physical properties and try to think ahead of the impact they will have on your design. Some considerations from the top of my head are response to temperature, bond strength, weight and density, response or resistance to moisture, as well as some basic load considerations. I wouldn’t expect non-engineers to do sophisticated calculations, nor do I do when I design furniture, but when in doubt, take that extra step and find a way to either test or calculate. I know this is a bit overboard, but if I get you to think about your materials critically then fantastic.
Approaching the design
I like to think I approach design in a linear fashion but in truth there are several considerations all moving in parallel towards my design goal. Try to keep these next three topics in mind, hopefully they will trigger each other as you move though towards fabrication. Like a great chef you should have these three items cooking all at once.
The basic geometry

Make it stand out
Whatever it is, the way you tell your story online can make all the difference.
The basic sketch - Tre Pezzi Dining Table
Kick off your design with a very basic sketch or model. Don’t go into the heavy details of how it will be assembled. Just draw or CAD out the basic shapes. You should ask yourself; how do you want this design to look? No matter what you are designing, furniture, an art piece, or a welding fixture, proportion and form are very important. Functional aspects will factor heavily and should take precedence. Be sure to scale and add critical dimensions. This first step is to take proportions, heights, widths, all into account. Even if it’s a simple table with 4 legs. Derive from this basic sketch the best representation of your thoughts onto paper, you want to capture the real-life representation as closely as possible. This sketching process is the best time to change direction before you put some heavy hours into a mechanical design you’re not loving.
Resources & shop limitation
Hopefully while sketching out your plans, you are triggered to think, how will I join that piece? Or cut that angle? Or mount that rail? Because often we design geometries that we can’t produce in a practical manner. It happens to me quite often. I’ll be designing or modeling something, and then I realize I can’t cut that in any practical way. In the world of CNC machining undercuts are notorious no-noes. Do not design something that’s out of your capacity to fabricate. At minimum if you’re designing something that looks challenging take a break to verify with a quick test. It will go a long way to verify. I once designed a miter cut only to realize my table saw had a limit at 45 degrees, it never occurred to me 55 degrees wasn’t achievable until I was ready to cut, and it broke my heart. So, as you go about your sketching take some time to evaluate the feasibility of what you are planning.
Special techniques for assembly
Jigs, cauls, and special finishes. Sometimes it’s not just building your project that can be a source of frustration, but side tasks spun out of the original project. Often you need to build a new something, to be able to build the original something you started building. That’s two builds now, and more material you must take into consideration, as well as some more designing you have got to do. Jigs of course are a great way to simplify the fabrication process and minimize error, they are helpful but can get complex and add a few weeks additional build time. Cauls on the other hand are bonding pieces that will be removed after assembly. When using cauls you need to design them to interface correctly as well as design-in a simple way to remove from the piece. Special finishes should also be taken into consideration. Are you going for that distressed look? Then take into consideration a multistep finishing process. A distressed finish typically requires applying a finish and partially removing. Then applying the overcoat that may or may not be partially removed as well. French polishing is another time-consuming finishing technique that leaves a glass like appearance on tabletops but will take a few attempts to master and achieve results like the professionals. So, consider those extra fabrication processes that will take time to build or implement. Because if these items are not built correctly, you could end up with some wasted time and material. If your shop is not equipped to build out the special fixtures, then it’s a good time to reconsider the design and plan on making something that will not require them.
The mechanical assembly:

The basic model - just shapes and hole patterns
Designing is an iterative process, you’ll work on it, find out it doesn’t work, and try again. When it comes to design, I try to temper my expectations and keep in mind that I won’t be able to knock it out on the first sitting. I’ll try something out and let it simmer before I decide to proceed. Sometimes it’s good to step away to think about it, and come back to it with a clear mind. In general, when sitting for a design I’ll try to work on it in 2–3-hour blocks. I’ll often set a timer, so I remember to take a break. With experience it gets easier, and you’ll develop approaches and tricks you can pull out of your toolbox of design knowledge. In any design there are an infinite number of possible options on how to pull off a mechanical assembly, the options may be overwhelming if you’ve been doing research. I find if I jump into a design and go straight into mechanical aspect of the design, I get overwhelmed and usually end up at a roadblock. So, as I mentioned, a great first step is a simple sketch. Once you get the juices flowing hopefully some of the mechanical questions will start to seep in and work themself into your process. The same way a comic book artist draws bodies with basic shapes, if you get your basic shapes and dimensions figured out, you’ll have a framework to work with and it keeps the process steady. Mechanical considerations can vary drastically from project to project. So, to generalize, a mechanical assembly would be all the guts of the design, when it comes to furnishings the big question is what is holding the entire piece together? What kind of joinery will you use? Will you employ the use of cams and inserts instead of using wood glue? Are there loan bearing sections that might be under stress? Will there be sections that move or slide? Will there be any interferences fit pieces that shift or lock into place? Will there be any leveling considerations, or will there be leveling feet added for non-level flooring? Where is your center of mass? Where is the tipping point of the piece? Is it at risk to to tip over and hurt someone? These are just a few questions that come to mind now. All these items need to be measured and taken into consideration for placement into the design.

The mechanical assembly - a lot to keep track of
When possible, use CAD:
Keeping every detail of a complex design is a daunting task, that is where CAD models really come in handy. If you’re just making a coffee table with 4 legs and top than its overboard to use CAD, you can draw that out on paper. I’m talking about more challenging builds, like a 60” dresser with 8 drawers, slides, rails, and decorative trim. If you’re making something with several components and hundreds of dimensions to keep track of, then computer aided design is the way to go. Not only does it help to take inventory of all your hardware and sub pieces, but it gives you a real-life representation of what you design will look like. What I love about CAD is it keeps your dimensions precise. So, when you cut to the model dimensions, the assemblies come together quite easily. When it comes to wood, I’d say you have plus or minus 0.030” of tolerance on a typical dimension, so if your decent about taking measurements you have a lot of wiggle room for some error. Wood is quite forgiving; you can squeeze and pull panels and sub-assemblies into place so keep that in mind. There are many free CAD programs out there and they are becoming more and more user friendly. If you haven’t yet tinkered around, please try one out. The typical CAD program will have an intuitive tutorial module, or you can find a guru online to show you some cool tricks. There’s nothing wrong with an old-fashioned sketch with pencil, but once you get a hang of modeling with a program you can do quick analysis like center of mass calculations and interference checks, it really does come in handy. But if your not there yet I get it. If your committed to the old school ways Just double check your math and at least have an excel to list all your materials.
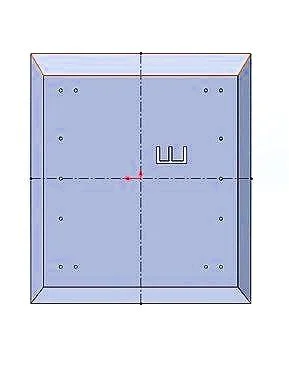
Use of symmetry about the x and y axis on a panel
Symmetry and mirroring:
Use symmetry to your advantage. Furniture is supposed to be symmetric, so just expand on mirrored pattern across multiple axis. Symmetric designs are expected, it looks balanced, and the mind finds symmetry attractive. Symmetry can extend to jigs and subcomponents as well. I designed a bookcase recently that was symmetric about the horizontal centerline, there was no right side up until I added the last details, being the feet and the few decorative trims. I often use the same approach when designing my joining sections, dimensioning joining hole patterns similarly throughout a design allows me to dummy proof how I’m orienting my components. I also tend to mirror hole patterns from a centerline, if an using identical components repeatedly in a design this mirroring trick allows me to get repeated use from a single jig or set up.
Testing:
Innovation is awesome, so if you have something innovative in mind try it out before you take the deep dive design wise. Prove the concept on a small scale. I took this approach once when designing a sliding jig for a 120” table bar. I first made a small-scale version and noted the issues. When I made the big one, which was quite expensive, I had less issues having worked out a few of the kinks on the first iteration. Had I had gone into the large-scale jig I’m sure it would have been a failure. I also often test bond strength for joints done on odd geometries or materials I have not worked with before. I did this once while working with a very expensive piece of teak. I first tested the effectiveness of the bond to be sure it would hold, testing till the wood ripped and I was satisfied the joining design was reliable. Testing will give you peace of mind to move forward with confidence, as well as some extra knowledge you’ll always be able to apply to another design.
Embrace change:
Diverting from a plan is not fun but sometimes it must be done. Don’t be afraid to go back to the drawing board. Design by nature is an iterative process and all the failures lead to success. Stubbornly refining a bad design is a shortcut that only leads to failure. listed to that voice in your head and give up when you know you’re heading off course. In this regard being a perfectionist is quite a great attribute to have. Often, I’ll have a go back to the drawing board on a design more than a few times, and each time come up with a feature that I will end up including in my final design. So not all is wasted when you are in the creative zone. It’s those who take the time to review all the details and refine potential issues that will end up with a smooth assembly and a good-looking finished product.
